Automated reporting with GCP Services: Getting Apple Search Ads data into a Google Sheet

Andreas Nguyen Arentoft
Marketing Science Director
Ready access to performance data is a crucial part of any digital marketer’s job, however, sometimes this is not as easy as it should be. In this blog post, our Senior Data Specialist Andreas Arentoft will walk you through how we used Google Cloud Platform (GCP) to automate reports for the quickly growing Apple Search Ads platform.
We will use GCP to automatically retrieve data from the Apple Search Ads API and print it to a Google Sheet, a light way of storing data. By using the open-source FUSE adapter, Cloud Storage FUSE (CS FUSE), we are able to utilize Cloud Storage as an easily accessible memory bank while executing the data retrieval in a Virtual Machine (VM).
We would like to thank BendingSpoons for their Apple Search Ads Python API library, which provided a solid foundation on which to build on when developing our solution.
If it sounds intimidating, don’t worry. Follow each step and you will have a fully automated solution ready in no time!
A bit more context…
Before we begin, the first question you might have is why we need to go through the trouble of using GCP. Apple Search Ads requires the establishment of an SSL connection in order to authenticate the HTTP requests for data. Two certificates must be generated in the Apple Search Ads interface and need to be stored as environment files in the directory from which the requests are made. Google Cloud Storage provided a secure and accessible way to store the certificates and access them from our development environment, which is why it is useful for us when authenticating the requests.
Guide
Overview
Before we start diving into the details, here is an overview of the full process of setting up the automated pull and how the GCP services are used. We’ll run through each of these points in more detail below.
- Enter the Apple Search Ads Interface and retrieve the certificates we need for the authentication.
- Set up authentication for the Google service by creating a Service Account Key and giving our service the needed access level to the Google Sheet where the data will be printed.
- Set up the Google services (Cloud Storage and Virtual Machine) and store the files needed for authentication in Cloud Storage.
- Prepare the VM for the scripts we need. This includes installing the necessary libraries and connecting a directory with our Cloud Storage using CS FUSE.
- Define the report we want to fetch from Apple Search Ads. We do this with a Python script which we store in the Cloud Storage bucket.
- Automate the script using Cron. Once you have set up the scheduling, you now have a fully automated data fetch solution!
Retrieving Apple Search Ads certificates
The very first step in this process is to retrieve the certificates that allow you to authenticate for Apple Search Ads. You will need to go to
https://app.searchads.apple.com/cm/app/settings/apicertificates
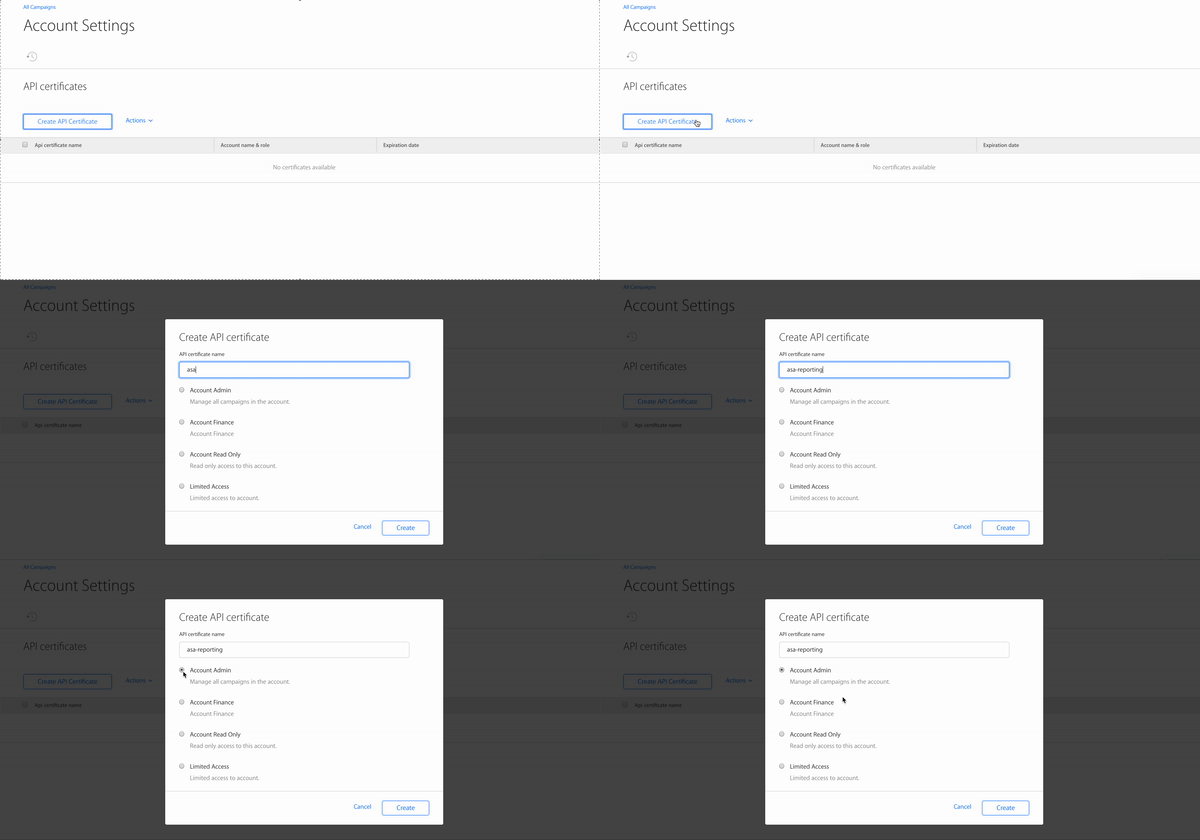
In the interface, click ‘Create API Certificate’. This will open a prompt where you give your certificate a name and select the access level. Both ‘Account Admin’ and ‘Account Read Only’ are sufficient for retrieving performance data. After these are done, click ‘Create’.
 You will now be able to see the newly created certificate in the interface. Notice that the certificate has an expiration date 25 months into the future. Make sure to put a reminder in your calendar to update the certificates when the time comes!
Now that we’ve created our credentials we will download the files. To do so, click the checkmark box to the left of the certificate, open the dropdown list by clicking ‘Actions’ and select ‘Download certificate’. This will download a .zip file that contains a .pem and .key file, which are our certificates. Open the .zip file and store the folder somewhere you can find it locally.
Setting up Cloud Storage and Computer Engine
The next step is setting up our GCP infrastructure. This includes our Cloud Storage bucket (the memory bank) and our VM (the machine that will run our code). Firstly, you will need to find a project with billing enabled. The cost associated with running this setup is quite small, but it does cost money to use the GCP services. In our case, the solution costs less than $20 per month, mostly driven by VM costs. In case you need to set up a new project, a guide can be found here.
Granting a service account access to Google Sheets
Once you have a project ready, we need to set up a service account that can interact with the Google Sheet where the data will be printed. Go to,
https://console.cloud.google.com/apis/credentials
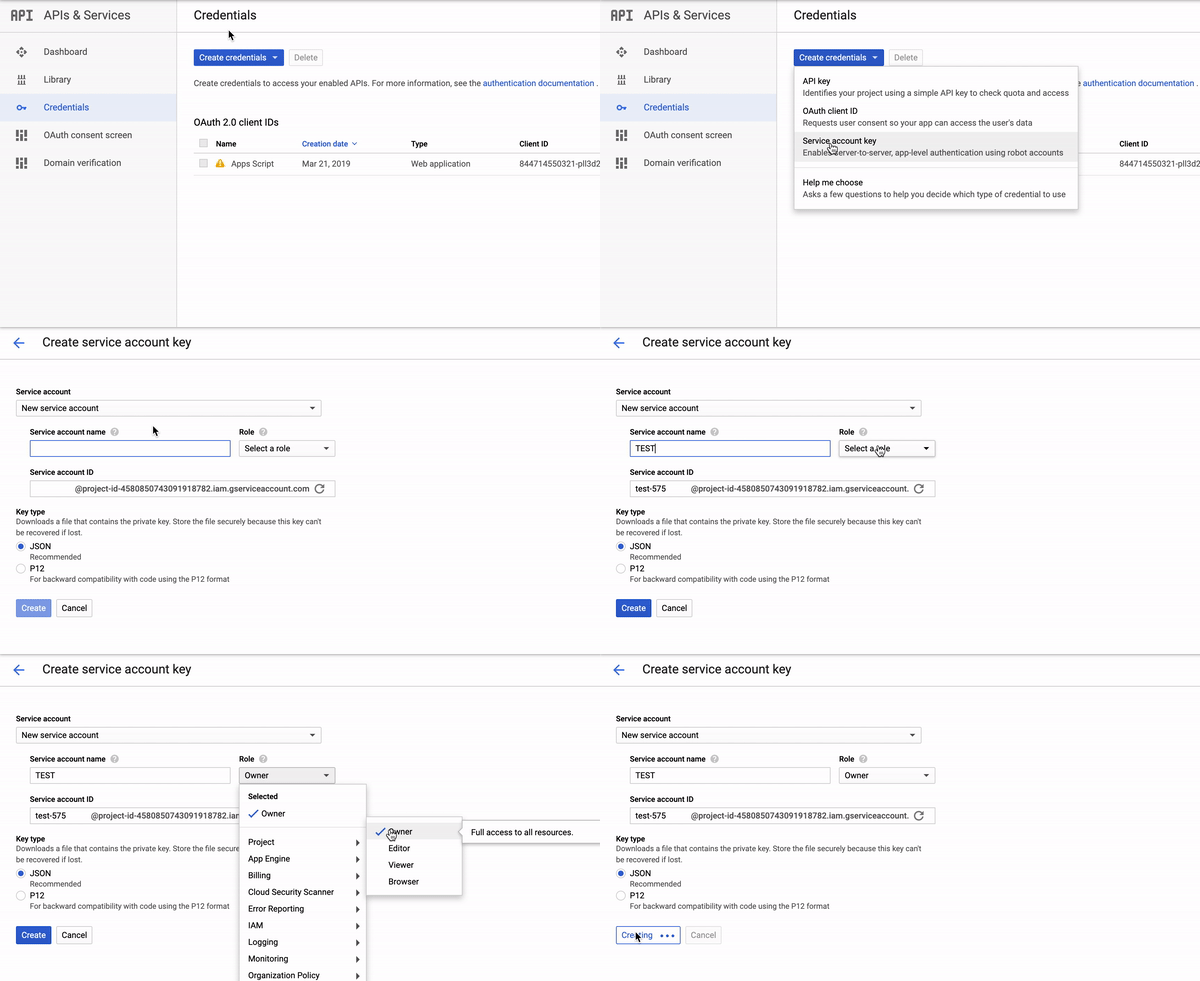
and click ‘Create Credentials’ and select ‘Service account key’. In the prompt, select ‘New service account’, give it a sensible name, and select a suitable role. We chose project → Owner, since we are going to work with both APIs and multiple Cloud Services. For this example to work, the key type should be JSON. A file will automatically be downloaded to your computer. Save it as ‘google_secret.json’ and store it somewhere you can find later.
 Now go to
https://console.cloud.google.com/iam-admin/serviceaccounts
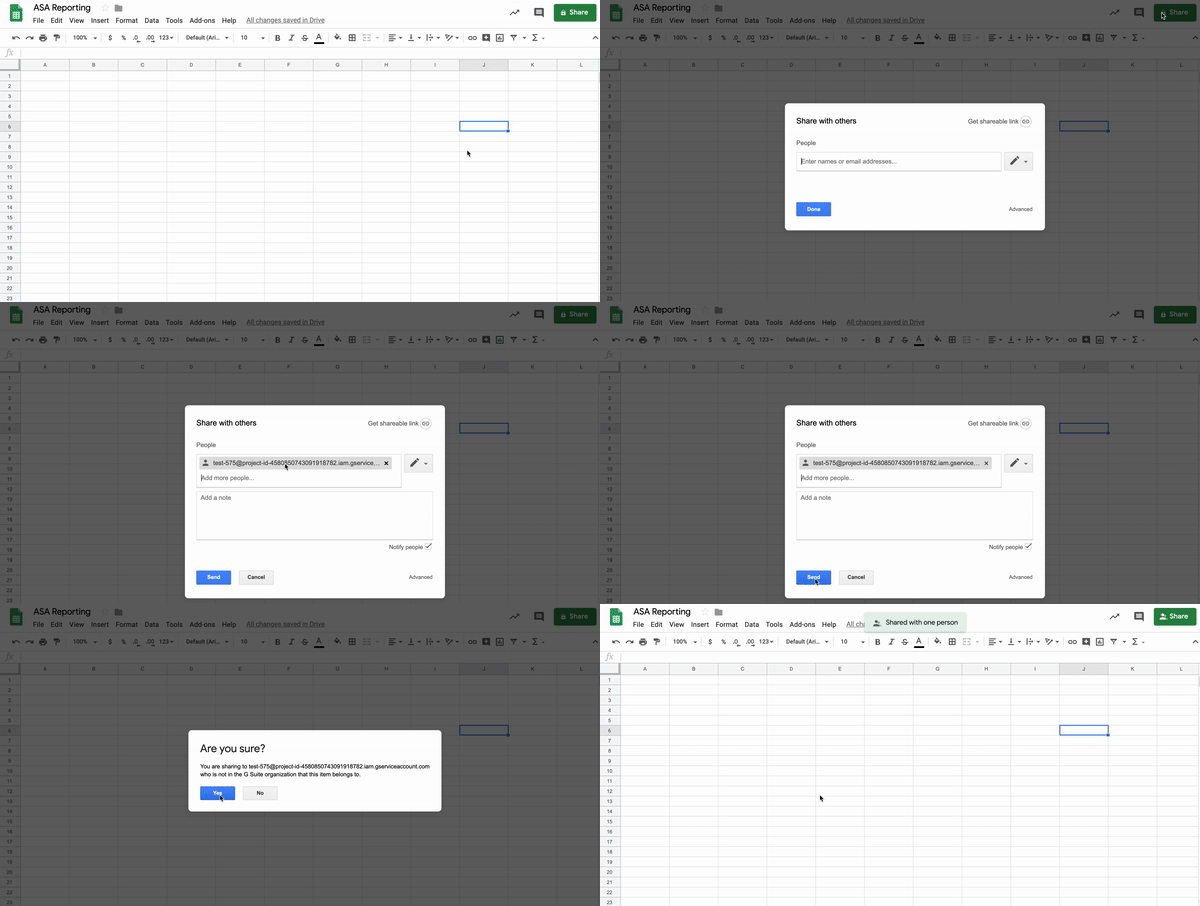
Here you need to find the Service Account you just set up and find the corresponding email. Copy it and open the Google Sheet where you want the data to be sent. Create a new one if need. Once you are in the sheet, open the sharing settings, and give ‘Edit’ access to the email belonging your service account. This allows services using the credentials to interact with the sheet.
 Once you have enabled the necessary authentication in the interface, go to
https://console.cloud.google.com/storage/
This opens your project’s Cloud Storage. We refer to these folders as “buckets”. Create a new bucket with your preferred settings and give it a sensible name.
Next, we need to set up the Virtual Machine which will perform the fetch. Go to,
https://console.cloud.google.com/compute/instances
Since the computer power needed for the operation we are scheduling will be minor, you will be able to select the least powerful (and hence cheapest) VM. A machine type with a small core (1 shared vCPU) and memory of 1.7 GB (default) is enough. We generally recommend Ubuntu 18.04 LTS, since it comes with Python 3.7 installed and is also compatible with CS FUSE (some newer versions are not). Make sure that the VM is allowed full access to all Cloud APIs and to enable HTTP and HTTPS traffic.
Set up your VM Instance
Now that we have set up and authenticated everything needed for our VM to run, we need to install the necessary libraries and link our VM and bucket. We will now work in VM’s terminal using Secure Shell (SSH), which can be opened from the VM instance overview. Find the VM you want to use, and click on the ‘SSH’ button to the right. This will open a terminal view. If it is a new VM, install pip (depending on the choice of machine, this might differ, but this guide explains how to do it if you have chosen a Ubuntu 18.04 machine for your VM).
Next, create a new folder. You can create a folder using
mkdir <folder name>
Now Install Google Cloud FUSE (CS FUSE) using below snippet:
export GCSFUSE_REPO=gcsfuse-`lsb_release -c -s`
echo “deb http://packages.cloud.google.com/apt $GCSFUSE_REPO main” | sudo tee /etc/apt/sources.list.d/gcsfuse.list
curl https://packages.cloud.google.com/apt/doc/apt-key.gpg | sudo apt-key add –
sudo apt-get update
sudo apt-get install gcsfuse
CS FUSE is a flexible way of mounting files from a bucket to a directory in a VM. This allows us to fetch the files we need to make the API calls to fetch the Apple Search Ads data. We mount the bucket using
gcsfuse <bucket name> <folder name>
Finally, we need to install the necessary libraries. Since we have not created a Virtual Environment for running the scripts, we need to pip install on user level using the –user flag. Run below commands in the terminal to install the necessary libraries:
pip3 install –user git+https://github.com/NoDataInCorner/searchads-api.git
pip3 install –user google-auth-httplib2
pip3 install –user google-api-python-client
Creating the report
With our VM up and running, we now need to leave the GCP interface and open up our text editor to create the script we will run to make the API calls. We will use a couple of Python libraries, including a library based on the work done by BendingSpoons. This repository takes the response from the Apple Search Ads API and creates a Pandas Dataframe, which we then transform into a format we can easily print into the Google Sheet. Below you can find a template for the script we want to run.
import pandas as pd
from search_ads import SearchAds, set_env
import httplib2
import os
from apiclient import discovery
from google.oauth2 import service_account
import numpy as np
#Insert the name of the account where you want to get data from
org_name = “<name of account>”
#Insert the name of the certification files that was uploaded to the Bucket
certs = {
“SEARCH-ADS-PEM”:os.path.join(os.getcwd(),”<name of pem file>.pem”),
“SEARCH-ADS-KEY”:os.path.join(os.getcwd(),”<name of key file>.key”),
}
#Insert the spreadsheet ID. You can find this in the spreadsheet URL,
#e.g. https://docs.google.com/spreadsheets/d/<spreadsheet id>/edit#gid=0
ss_id = “<spreadsheet id>”
secret_file = os.path.join(os.getcwd(),”google_secret.json”)
scopes = [“https://www.googleapis.com/auth/drive”, “https://www.googleapis.com/auth/drive.file”, “https://www.googleapis.com/auth/spreadsheets”]
credentials = service_account.Credentials.from_service_account_file(secret_file,scopes = scopes)
service = discovery.build(“sheets”,”v4″,credentials=credentials)
#Here you can define the report, you need to fetch
#In this example, a campaign report is pulled, but you can also
#get data on ad group, keyword and search term level
#For more information about the options, read the full documentation:
#https://github.com/BendingSpoons/searchads-api
with set_env(**certs):
api = SearchAds(org_name)
campaign_report = api.get_campaign_report(start_time = “2019-01-01”, granularity = “DAILY”)
campaign_report_out = campaign_report[[“date”, “campaignName”, “localSpend”, “impressions”, “taps”, “conversions”, “conversionsNewDownloads “, “conversionsRedownloads”]]
campaign_report_out_noNaN = pd.DataFrame.fillna(campaign_report_out, value = 0)
#Configure this part of the script to fit the range where the data
#need to be printed
rows = str(len(campaign_report_out_noNaN.index)+1)
rng_name = “<range in spreadsheet, e.g. Sheet!A2:H>”+rows
data = {“values”:campaign_report_out_noNaN.values.tolist()}
service.spreadsheets().values().update(spreadsheetId=ss_id,body=data,range = rng_name,valueInputOption= “USER_ENTERED”).execute()
Change below fields to suit your needs:
- <name of account>
– The name of the ASA account you want to get data from. - <name of pem file>
– The name of the certificate file you have downloaded from the Apple Search Ads interface. - <name of key file>
– The name of the key file you have downloaded from the Apple Search Ads interface. - <spreadsheet id>
– The ID of the spreadsheet where you want the data to be printed. - <range in spreadsheet, e.g. Sheet!A2:H>
– The script needs to know there the data should be printed. It follows the same syntax as in Google Sheets.
In this example, we pull campaign data from the 2019-01-01 until now. Each row is split by campaign and date with the granularity setting is set a ‘DAILY’. Since we receive the data as a Pandas data frame, we can easily select which columns we need. These specifications can be changed to fit your exact needs. Read the documentation provided by BendingSpoones for more information.
After you have changed the script to suit your needs, upload it to the bucket. You can test it by running below snippet in the VM’s terminal:
cd /home/<username>/<folder name>
python3 <script name>.py
Test it thoroughly and wait until you are completely satisfied with the output before moving onto the next stage.
Setting up Scheduling
Once you have created the script to fetch and print Apple Search Ads data into a Google Sheet, it is time for the last step: scheduling with Cron. Although you can execute a python script using Cron, we opted to first create a small shell script which executes the python script. Below is an example of this shell script:
#!/bin/sh
cd /home/<username>/<folder name>
python3 <script name>.py
The shell script must be located in Cloud Storage so that we can access it easily.
The next step is to set up a cron job. Once you have entered the terminal, you can open the cron interface/commands by using the command:
crontab -e
If this is the first time you have opened cron in your VM, you will be asked which interface you want to use. Any can be used, but the below example used 1: nano. Once you are in crontab, you will be able to add a new cron job. A cron job consists of a time component and a command component but is executed as one line. The syntax for a cron job can be found below:
# ┌───────────── minute (0 – 59)
# │ ┌───────────── hour (0 – 23)
# │ │ ┌───────────── day of the month (1 – 31)
# │ │ │ ┌───────────── month (1 – 12)
# │ │ │ │ ┌───────────── day of the week (0 – 6)
# * * * * * command to execute
If you want to know more about how to use cron, check out this very concise and useful article.
Our cron job will run every hour to ensure data freshness and will execute the shell script in the Cloud Storage bucket. The resulting cronjob we created looks like the one below:
30 * * * * sh /home/<user name>/<folder name>/<script name>.sh
This script is executed in the 30th minute of every hour. Once added to the crontab interface, we can save the job by clicking ctrl+’x’ → Y → ENTER. This takes us back to the terminal. In case you want to verify that the job is set up correctly, use the command
crontab -l
to see all currently stored jobs.
You now have a fully automated solution that retrieves Apple Search Ads performance data and sends it to a Google Sheet.
Final Note
GCP infrastructure is flexible and easy to work with and with this solution, we were able to take advantage of many of the in-built features and functionalities. Besides the flexibility that CS FUSE provides, working within the Google environment removes many issues when dealing with authentication, as well as an ‘always-on’ VM unlocks other benefits, such as a central place to store ones’ cronjobs and it is easily ported between projects.
Again, many thanks to BendingSpoones for providing a library for interacting with the Apple Search Ads API which greatly eased the development of this solution.
There are many solutions we could have used to execute this task, however, this solution really showed how powerful the interconnectedness of the GCP is.


